Accessing composer item properties via custom expressions in QGIS


So here is a neat trick. Lets say you wanted to access the scale of a composer map to make it part of a label. The scale bar can already be set to numeric to show the number value but what if it needs to be part of an existing label with other text. Not to fear, expression functions are here.

  • Create a new composer. Add the map frame and a label.
  • Set the item ID of the map frame to something you can remember, lets just use themap
  • Select the label and add some text
  • Click Insert Expression

Now for the cool part

  • Select Function Editor
  • Click New File. Give the file a new name and hit save. I called it composer functions.

In the code editor paste this code:

from qgis.utils import iface
from qgis.core import *
from qgis.gui import *

@qgsfunction(args="auto", group='Composer')
def composeritemattr(composername, mapname, attrname, feature, parent):
    composers = iface.activeComposers()
    # Find the composer with the given name
    comp = [composer.composition() for composer in composers 
                if composer.composerWindow().windowTitle() == composername][0]
    # Find the item
    item = comp.getComposerItemById(mapname)
    # Get the attr by name and call 
    return getattr(item, attrname)()
  • Click Run Script

run

Now in your label use this text:

Scale: [% composeritemattr('Composer 1', 'themap', 'scale')%]

Update the Composer 1 to match your composer name, and the themap to match your item ID.

and like magic here is the scale from the map item in a label:

2015-05-21 22_00_09-Composer 1

Check the expression error section if the label doesn’t render

error

Installing Python setuptools into OSGeo4W Python


The easiest way install Python libraries is to use easy_install and pip.  easy_install and pip are package managers for Python. From the easy_install page:

Easy Install is a python module (easy_install) bundled with setuptools that lets you automatically download, build, install, and manage Python packages.

and from the pip page:

pip is a tool for installing and managing Python packages, such as those found in the Python Package Index. It’s a replacement for easy_install.

To get easy_install you need to install Python setuptools and you are good to go. Sounds easy!  However the setuptools installer assumes that you have the normal standalone Python installed which writes it’s install location to the registry, and when you run the installer it will say that it can’t find Python on the system.  What the!?

If you have installed QGIS, or any other tool from the OSGeo4W install, you will see that OSGeo4W bundles its own version of Python in: C:\OSGeo4W\apps\python27. This is the Python that is used when calling python in the OSGeo4W shell.  It seems someone on the OSGeo wiki has made a bootstrapped installer for setuptools that will install setuptools and easy_install into the  C:\OSGeo4W\apps\python27 folder for you.

Steps to take

  • Download ez_setup.py
  • Run python ez_setup.py in your OSGeo4W shell
  • Done!

To install a package with easy_install just use:

easy_install {packagename}

I wanted to have bottle and flask installed:

easy_install bottle

which gives you something like:

Searching for bottle
Reading http://pypi.python.org/simple/bottle/
Reading http://bottle.paws.de/
Reading http://github.com/defnull/bottle
Reading http://bottlepy.org/
Best match: bottle 0.11.4
Downloading http://pypi.python.org/packages/source/b/bottle/bottle-0.11.4.tar.gz#md5=f767c340de0b7c9581917c48e609479b
Processing bottle-0.11.4.tar.gz
Running bottle-0.11.4\setup.py -q bdist_egg –dist-dir c:\users\woo\appdata\local\temp\easy_install-5b4qq6\bottle-0.11.4\egg-dist-tmp-q2yd68
zip_safe flag not set; analyzing archive contents…
bottle: module references __file__
bottle: module references __path__
Adding bottle 0.11.4 to easy-install.pth file
Installing bottle.py script to C:\OSGeo4W\apps\Python27\Scripts
Installed c:\osgeo4w\apps\python27\lib\site-packages\bottle-0.11.4-py2.7.egg
Processing dependencies for bottle
Finished processing dependencies for bottle

Install pip

Note

Most of the time any Python packages that are needed by your OSGeo4W tools are bundled in the installer and can be downloaded using the OSGeo4W installer, however there have been cases when I wanted to install a non OSGeo4W package into my setup by using easy_install or pip. Like bottle and flask in the example above.

Don’t forget to migrate your QGIS plugins!


From QGIS 1.8 and onwards the Plugin Installer plugin will no longer include the option to add the 3rd party repositories.  This was by design and intended to move people over to using the official plugin repository at http://plugins.qgis.org/ so we can provide a richer experience and keep everything in one place.

If you have plugins that are still not on the official repository then I would strongly recommend that you migrate them as a lot of new 1.8 users will be missing out on your great work.

Generating chainage (distance) nodes in QGIS


Something that I need to do now and then is generate points along a line at supplied distance.  I had never really looked into doing it in QGIS until this question poped up on gis.stackexchange.com.  This is a quick blog post because I thought it was a pretty handy little thing to do.

In the development version there is a new method on QgsGeometry called interpolate. This method takes a distance and returns a point along a line at that distance. Perfect! We can then just wrap this in a loop and generate a point increasing the distance as we move along

from qgis.core import (QgsFeature, QgsGeometry,
                       QgsVectorLayer, QgsMapLayerRegistry,
                       QgsField)
from PyQt4.QtCore import QVariant
from qgis.utils import iface

def createPointsAt(distance, geom):
    length = geom.length()
    currentdistance = distance
    feats = []

    while currentdistance < length:
        # Get a point along the line at the current distance
        point = geom.interpolate(currentdistance)
        # Create a new QgsFeature and assign it the new geometry
        fet = QgsFeature()
        fet.setAttributeMap( { 0 : currentdistance } )
        fet.setGeometry(point)
        feats.append(fet)
        # Increase the distance
        currentdistance = currentdistance + distance

    return feats

def pointsAlongLine(distance):
    # Create a new memory layer and add a distance attribute
    vl = QgsVectorLayer("Point", "distance nodes", "memory")
    pr = vl.dataProvider()
    pr.addAttributes( [ QgsField("distance", QVariant.Int) ] )
    layer = iface.mapCanvas().currentLayer()
    # Loop though all the selected features
    for feature in layer.selectedFeatures():
        geom = feature.geometry()
        features = createPointsAt(distance, geom)
        pr.addFeatures(features)
        vl.updateExtents()

    QgsMapLayerRegistry.instance().addMapLayer(vl)

The above code might look a bit scary at first if you have never done any Python/pyqgis but hopefully the comments will ease the pain a little. The main bit is the createPointsAt function.

Cool! If we want to use this we can just stick it in a file in the .qgis/python folder (lets call it pointtools.py) and then run import pointtools in the python console.

So lets have a go. First select some objects then run the following in the Python Console

import pointtools
pointtools.pointsAlongLine(40)

That will generate a point every 40 meters along then selected lines

Distance nodes along line in qgis-dev

To generate nodes along different lines, select the new features, then call pointtools.pointsAlongLine(40) in the Python console.

Simple as that!

(Who knows, someone (maybe me) might even add this as a core object function in QGIS in the future)

A new QGIS plugin: Python Script Runner


Gary Sherman has just published a new Python plugin for QGIS that I think people will find very handy, I know I will.  The plugin allows you to run Python scripts inside QGIS for tasks that don’t really require, or warrant, a whole plugin.

Go check out Gray’s post about the new plugin at http://spatialgalaxy.net/2012/01/29/script-runner-a-plugin-to-run-python-scripts-in-qgis/

The new plugin can be installed via the Plugin Installer using the “runner” or “script”.  The Plugin Installer is another one of my favorite plugins for QGIS, being able to push out a new plugin and know that everyone can get it is a good feeling :)

Using Python and MapInfo with Callbacks


The other day I posted an entry about using MapInfo with Python and Qt (see https://woostuff.wordpress.com/2011/03/05/mapinfo-map-control-into-qt-python-form/), one big thing that I missed was support for callbacks, which if you want to do anything related to integrated mapping is a must for map tool support.

Turns out it is pretty easy, and today I worked out how.

You will need to create a class in python that looks something like this:

class Callback():
    _public_methods_ = ['SetStatusText']
    _reg_progid_ = "MapInfo.PythonCallback"
    _reg_clsid_ = "{14EF8D30-8B00-4B14-8891-36B8EF6D51FD}"
    def SetStatusText(self,status):
        print status

This will be our callback object that we will need to create for MapInfo.

First I will explain what some of the funny stuff is:

  • _public_methods_ is a Python array of all the methods that you would like to expose to COM eg MapInfo in this case. This attribute is a must for creating a COM object.
  • _reg_progid_ is the name of your COM application or object.  This can be anything you would like.
  • _reg_clsid_ is the GUID, or unique id, for the object or app.  Do not use the one I have, call the following in a Python shell to create your own.
             import pythoncom
             pythoncom.CreateGuid()
             
  • SetStatusText is the MapInfo callback method that is called when the status bar changes in MapInfo.

In order to use the class as a COM object we have two more steps to complete, one is registering the COM object and the other is creating it.

First, in oder to register the object we call the following code from our main Python method:

if __name__ == "__main__":
    print "Registering COM server..."
    import win32com.server.register
    win32com.server.register.UseCommandLine(Callback)
    main()

This will register the COM object which will mean it can then be creating for use by MapInfo.

In order to create our callback in Python we call:

callback = win32com.client.Dispatch("MapInfo.PythonCallback")

and set it as our callback object for MapInfo:

mapinfo.SetCallback(callback)

So after all that the final code looks like this:

def main():
    from PyQt4.QtCore import *
    from PyQt4.QtGui import *
    from win32com.client import Dispatch
    import sys

    app = QApplication(sys.argv)
    app.setAttribute(Qt.AA_NativeWindows,True)
    wnd = QMainWindow()
    wnd.resize(400, 400)
    widget = QWidget()
    wnd.setCentralWidget(widget)
    wnd.show()

    handle = int(widget.winId())
    mapinfo = Dispatch("MapInfo.Application")
    callback = win32com.client.Dispatch("MapInfo.PythonCallback")
    mapinfo.SetCallback(callback)
    mapinfo.do('Set Next Document Parent %s Style 1' % handle)
    mapinfo.do('Open Table "D:\GIS\MAPS\Property.TAB"')
    mapinfo.do('Map from Property')

    app.exec_()

class Callback():
    """ Callback class for MapInfo """
    _public_methods_ = ['SetStatusText']
    _reg_progid_ = "MapInfo.PythonCallback"
    _reg_clsid_ = "{14EF8D30-8B00-4B14-8891-36B8EF6D51FD}"
    def SetStatusText(self,status):
        print status

if __name__ == "__main__":
    print "Registering COM server..."
    import win32com.server.register
    win32com.server.register.UseCommandLine(Callback)
    main()

and the result is a map window and information printed to the console.

Information from MapInfo callback

I think Python could be a good language to prototype MapInfo based app, or even build a whole app itself. If you do end up making something of it let me know I am quite interested with what people could come up with.

Opening MS SQL Server 2008 Spatial tables in QGIS


EDIT:  If you are having trouble opening MS SQL 2008 in QGIS I will have a blog post coming explaining how to correct it. Or you can read the comments between TheGeoist and I below which will have the answer.

Just a quick tip.

Thanks to GDAL/OGR 1.8 QGIS can now open MS SQL Server 2008 spatial tables via the OGR MSSQLSpatial driver.

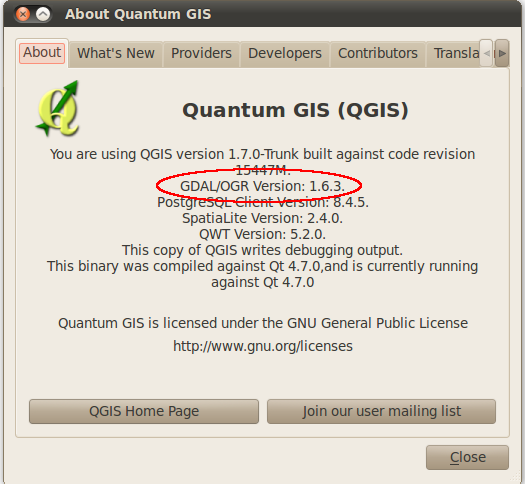
First you must be running a version of QGIS that is using GDAL/OGR 1.8.  Opening the QGIS about page will tell you if it is supported.

Need version 1.8 or higher

As I am writing this on my Ubuntu install I only have version 1.6.3 but the latest dev version of QGIS (upcoming 1.7 release) for Windows in the OSGeo4W installer is complied with version 1.8.

Now open the python console in QGIS and type the following:

uri = "MSSQL:server={serverName};database={databaseName};tables={tableName};trusted_connection=yes"
qgis.utils.iface.addVectorLayer(uri,'{yourLayerNameHere}','ogr')

Replacing {serverName} with your server name, if installed on your local machine you can use localhost; {databaseName} with the name of the database with the tables;{tableName} with the table to open; {yourLayerNameHere} with the name you would like the layer to have in the map legend.

After that you should see your MS SQL Spatial table displayed in QGIS, with editing support.

At the moment there is no nice interface in QGIS to open MS SQL tables like there is for PostGIS, although that might be a good plugin project for someone to work on.

Opening MS SQL Server 2008 Spatial tables in QGIS


Blog has now moved to <a href="http://nathanw.net&quot;EDIT:  If you are having trouble opening MS SQL 2008 in QGIS I will have a blog post coming explaining how to correct it. Or you can read the comments between TheGeoist and I below which will have the answer.

Just a quick tip.

Thanks to GDAL/OGR 1.8 QGIS can now open MS SQL Server 2008 spatial tables via the OGR MSSQLSpatial driver.

First you must be running a version of QGIS that is using GDAL/OGR 1.8.  Opening the QGIS about page will tell you if it is supported.

Need version 1.8 or higher

As I am writing this on my Ubuntu install I only have version 1.6.3 but the latest dev version of QGIS (upcoming 1.7 release) for Windows in the OSGeo4W installer is complied with version 1.8.

Now open the python console in QGIS and type the following:

uri = "MSSQL:server={serverName};database={databaseName};tables={tableName};trusted_connection=yes"
qgis.utils.iface.addVectorLayer(uri,'{yourLayerNameHere}','ogr')

Replacing {serverName} with your server name, if installed on your local machine you can use localhost; {databaseName} with the name of the database with the tables;{tableName} with the table to open; {yourLayerNameHere} with the name you would like the layer to have in the map legend.

After that you should see your MS SQL Spatial table displayed in QGIS, with editing support.

At the moment there is no nice interface in QGIS to open MS SQL tables like there is for PostGIS, although that might be a good plugin project for someone to work on.

MapInfo map control into Qt Python form


Tonight for a bit of fun, or shits and jiggles as we say here, I thought I would try and embed a MapInfo map control into a Qt python widget (although I should be studying, but it’s Saturday night) .

Turns out it is pretty easy!

pls send me teh codez? OK here you go.

from PyQt4.QtCore import *
from PyQt4.QtGui import *
from win32com.client import Dispatch
import sys

app = QApplication(sys.argv)
app.setAttribute(Qt.AA_NativeWindows,True)
wnd = QMainWindow()
wnd.resize(400, 400)
widget = QWidget()
wnd.setCentralWidget(widget)
wnd.show()

handle = int(widget.winId())
mapinfo = Dispatch("MapInfo.Application")
mapinfo.do('Set Next Document Parent %s Style 1' % handle)
mapinfo.do('Open Table "D:\GIS\MAPS\Property.TAB"')
mapinfo.do('Map from Property')

app.exec_()

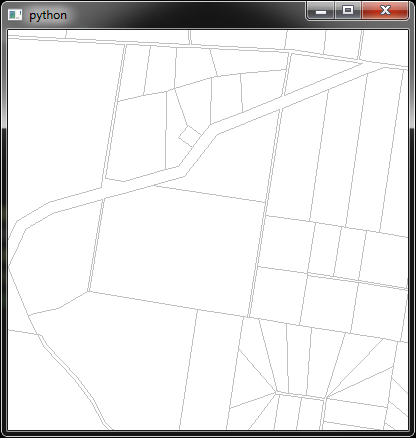
The above code will load MapInfo and open the property layer into the Qt Widget control, with the result below.

MapInfo map in python Qt based form

So this means you don’t “always” have to write your MapInfo based apps in C# or C++; of course I already knew this as anything that can use OLE and provide a native window handle to MapInfo will work, I just never tried it.

Generating contour lines in QGIS


One of the cool things I love about QGIS is finding stuff that you didn’t know it could do, well not just itself but plugins that you didn’t know about.

Today my discovery was in how to generate contour lines from a point layer.

  1. First install the contour plugin for qgis via the plugin installer.  Just search for “contour”
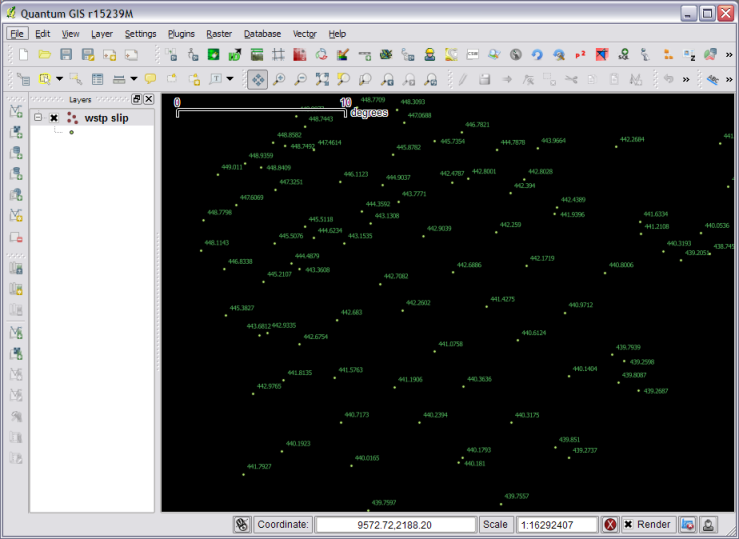
  2. Once installed open a vector point layer in QGIS.  Make sure the point layer has a field that you can use for elevation.

    One I prepared earlier
  3. Then select from the menu: Plugins->Contour->Contour
  4. Fill in the information

    Details form (The above setting will generate 0.5m contours)
  5. Press OK
  6. Results

    Results from plugin
  7. Profit??

The resulting contours will have a field that contains the label and z value for each contour line, you can then just label or color them how you wish.

Note:  There is a bug with QGIS memory layers where the fields don’t  show up in dropdown or attribute browsers, a simple fix is just to make the layer editable and then non editable then the fields will be there.

The contour layer is a QGIS memory layer so remember to save it to disk eg a shapefile before you close you will loose your new fancy contour layer.

Happy mapping :)