Styling maps in QGIS is better when it’s interactive


I’m sure you are all well aware of my hate of blocking dialogs, and when it comes to styling QGIS has a few and they annoy me to no end. With new fancy map making tools like MapBox and CartoDB all having nice non blocking styling options it’s about time QGIS followed suit to bring better control and faster workflows to users.

The first stage of the dock is complete, pending feedback of course, and merged into master.

Introducing the map styling dock:

2016-04-19 20_27_00-Action center

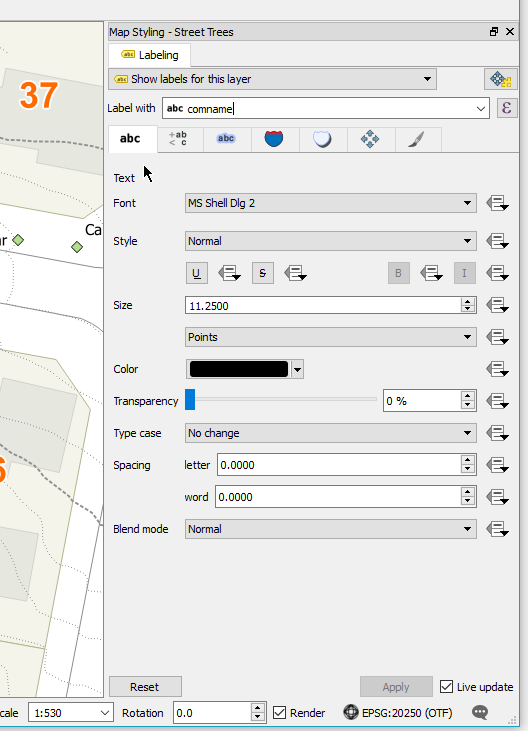
Having the style (label only at the moment) options in a dock widget opens up some really nice workflows to map styling.

Firstly, now you don’t have to do the Open -> Change Setting -> Apply -> Close -> Open dance each time you want to change a layer style.  The dock is linked to the active layer in the legend so you can move around freely, update settings, and move on.

Second, we can now have a great workflow and allow for live updating. Yes you did read that right, it will live update the map as you change values. How bloody great is that!  Reducing the feedback loop is always the best.  If it can be done live, do it live.  There is a Reset button if you make a mistake.

Third, all styling options will now live in a single location going forward. Once we have moved style, diagrams, blend modes, it will be a one stop shop for styles with no annoying dialogs getting in the way.

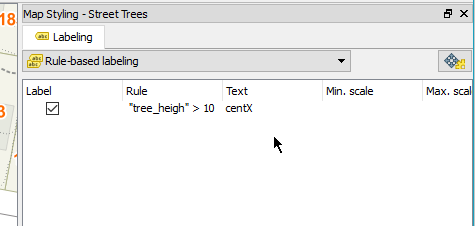
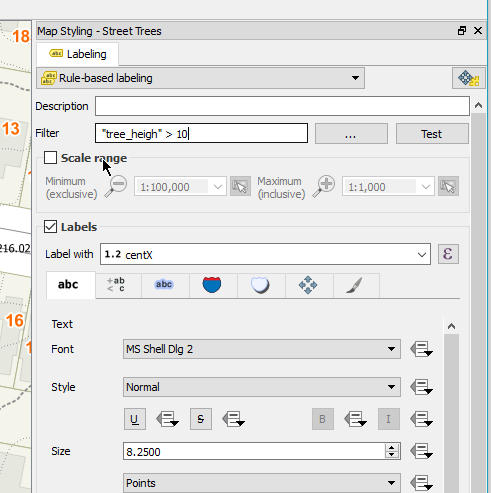
In QGIS 2.14 we also have this awesome feature for rule based labels, however that added another dialog, and I wasn’t going move to a dock just to have another dialog block me two steps down the road. So now all the rules based labels dialogs are panels inside the main dock. When adding a new rule it will show the rule editor, and the list when not.  Remember how I said the dock updates the map live, well that also applies when you add/update rules.  The dock will update the canvas as the rule changes even before you hit save on the rule

2016-04-19 20_48_36-Action center

2016-04-19 20_48_28-Action center

The new styling dock is in master now, although might not be in the nightly build for a day or so.

You can check out some videos of the dock in action here:

Super keen on any feedback and ideas anyone might have.  Give it a try and let me know what you think.

EDIT: I would also like to add that what I have started/done is only possible because of the great work that has been done before me. Big thanks to all the people that have done work to enable me to make this feature,  label settings, threaded rendering, data defined buttons, etc.

Good news for QGIS MapInfo users


So some good news for QGIS users who also need/want to use MapInfo.  QGIS via GDAL 2.0 can support MapInfo TAB file editing. In all older versions of GDAL there was only support for read and/or write but not both.

MapInfo TAB editing has been supported in GDAL 2 but up until this point QGIS has only be built against GDAL 1.xx.  GDAL 2.x is now the default GDAL release in OSGeo4w.

From Jurgen:

2.0.2 is now the default GDAL in OSGeo4W and the nightlies (qgis-ltr-dev,
qgis-rel-dev and qgis-dev) already picked it up.

With the next release the regular packages (2.14 and 2.8) will also be updated
to use it

Even if you don’t want to make the switch to full QGIS you can now use both bits of software and edit in both.

QGIS will still only support a single geometry type per layer so if you open a mixed tab file you will get the geometry type selector.  You can load the layer 3 times if you need the 3 different geometry types.


Not always about new features


I love a good feature just as much as the next person but sometimes it’s great to fix a small workflow issue that has bugged you for the longest time.

If you have ever seen this kind of dialog you will know what I mean

error

The good old Python error dialog in QGIS.  The dialog is there to tell you that an exception was raised in Python somewhere and would dump out the error for you to debug it.   One big issue with this dialog though.  It’s blocking.  Blocking dialogs are really bad.   As a user, the blocking dialog means a broken workflow. Worst of all, there really is nothing you can do about it because the only thing you can do is close.

This dialog has now been replaced with a message bar if something goes wrong in Python code.  The message bar is non blocking and lets you continue working even if something didn’t work correctly.

message

The message bar has two buttons.  One will open the stack trace dialog to see the error in more detail. The other button opens the log window.

dialog

The message bar will only show a single error message for each type of error even if there are multiple exceptions in a row. A good example of this is an error in a mouse move event handler causing a error on each mouse move.

UI theme support now core in QGIS


I enjoy using the dark UI theme for QGIS so much I figured why not make it a core feature. In the next version of QGIS if you head to the options screen you can now find a UI Theme option.

Options | General_037

The default dark theme is called Night Mapping for all those late night mapping jobs that you do, or if you just like dark UI themes.

QGIS b789fab_029

Selection_031

Selection_034

Something you will notice with this theme is the custom icons for the layer visibility. Pretty nifty! Here is how it is done

Creating new themes

To create a new theme simply make a new folder in .qgis2\themes\ with the name of the theme you want and create a style.qss file inside there. Check out the default themes for an example

Follow the Qt style sheet guides to see what can be styled.

Something I have added on top of the normal style sheets is variable support. Variables can be declared in a variables.qss file in the theme folder.

Here is an example of some variables:

@background: #323232
@text: #aaa
@selection: #507098
@menuback: #444
@highlight: #ffaa00

Now in style.qss we can do this:

QWidget
{
color: @text;
background-color: @background;
}

Great for not having to repeat your self or quick updating in a single place. When the theme is applied via the Options dialog or via the API it will replace the variables in style.qss using variables.qss. The result file is called style.qss.auto

Needs some tweaks

The default dark theme is a collection of stuff I have found around the net and stuff I have added myself. It’s far from prefect and I would love help to make it the best dark theme for QGIS. If you have another theme you think would make a good default one open a pull request on GitHub

Enjoy

Accessing composer item properties via custom expressions in QGIS


So here is a neat trick. Lets say you wanted to access the scale of a composer map to make it part of a label. The scale bar can already be set to numeric to show the number value but what if it needs to be part of an existing label with other text. Not to fear, expression functions are here.

  • Create a new composer. Add the map frame and a label.
  • Set the item ID of the map frame to something you can remember, lets just use themap
  • Select the label and add some text
  • Click Insert Expression

Now for the cool part

  • Select Function Editor
  • Click New File. Give the file a new name and hit save. I called it composer functions.

In the code editor paste this code:

from qgis.utils import iface
from qgis.core import *
from qgis.gui import *

@qgsfunction(args="auto", group='Composer')
def composeritemattr(composername, mapname, attrname, feature, parent):
    composers = iface.activeComposers()
    # Find the composer with the given name
    comp = [composer.composition() for composer in composers 
                if composer.composerWindow().windowTitle() == composername][0]
    # Find the item
    item = comp.getComposerItemById(mapname)
    # Get the attr by name and call 
    return getattr(item, attrname)()
  • Click Run Script

run

Now in your label use this text:

Scale: [% composeritemattr('Composer 1', 'themap', 'scale')%]

Update the Composer 1 to match your composer name, and the themap to match your item ID.

and like magic here is the scale from the map item in a label:

2015-05-21 22_00_09-Composer 1

Check the expression error section if the label doesn’t render

error

PSA: Please use new style Qt signals and slots not the old style


Don’t do this:

self.connect(self.widget, 
             SIGNAL("valueChanged(int)"), 
             self.valuechanged)

It’s the old way, the crappy way. It’s prone to error and typing mistakes. And who really wants to be typing strings as functions and arg names in it. Gross.

Do this:

self.widget.valueChanged.connect(self.valuechanged)
self.widget.valueChanged[str].connect(self.valuechanged)

Much nicer. Cleaner. Looks and feels like Python not some mash up between C++ and Python. The int argument is the default so it will use that. If you to pick the signal type you can use [type].

Don’t do this:

self.emit(SIGNAL("changed()", value1, value2))

Do this

class MyType(QObject):
   changed = pyqtSignal(str, int)

   def stuff(self):
       self.changed.emit(value1, value2)

pyqtSignal is a type you can use to define you signal. It will come with type checking, if you don’t want type checking just do pyqtSignal(object).

Please think of the poor kittens before using the old style in your code.

A interactive command bar for QGIS


Something that has been on my mind for a long time is a interactive command interface for QGIS.  Something that you can easily open, run simple commands, and is interactive to ask for arguments when they are needed.

After using the command interface in Emacs for a little bit over the weekend – you can almost hear the Boos! from heavy Vim users :) – I thought this is something I must have in QGIS as well.  I’m sure it can’t be that hard to add.

So here it is.  A interactive command interface for QGIS.

commandbar

commandbar2

The command bar plugin (find it in the plugin installer) adds a simple interactive command bar to QGIS. Commands are defined as Python code and may take arguments.

Here is an example function:

@command.command("Name")
def load_project(name):
    """
    Load a project from the set project paths
    """
    _name = name
    name += ".qgs"
    for path in project_paths:
        for root, dirs, files in os.walk(path):
            if name in files:
                path = os.path.join(root, name)
                iface.addProject(path)
                return
    iface.addProject(_name)

All functions are interactive and if not all arguments are given when called it will prompt for each one.

Here is an example of calling the point-at function with no args. It will ask for the x and then the y

pointat

Here is calling point-at with all the args

pointatfunc

Functions can be called in the command bar like so:

my-function arg1 arg2 arg2

The command bar will split the line based on space and the first argument is always the function name, the rest are arguments passed to the function. You will also note that it will convert _ to - which is easier to type and looks nicer.

The command bar also has auto complete for defined functions – and tooltips once I get that to work correctly.

You can use CTRL + ; (CTRL + Semicolon), or CTRL + ,, to open and close the command bar.

What is a command interface without auto complete

autocomplete

Use Enter to select the item in the list.

How about a function to hide all the dock panels. Sure why not.

@command.command()
def hide_docks():
    docks = iface.mainWindow().findChildren(QDockWidget)
    for dock in docks:
        dock.setVisible(False)

alias command

You can also alias a function by calling the alias function in the command bar.

The alias command format is alias {name} {function} {args}

Here is an example of predefining the x for point-at as mypoint

-> alias mypoint point-at 100

point-at is a built in function that creates a point at x y however we can alias it so that it will be pre-called with the x argument set. Now when we call mypoint we only have to pass the y each time.

-> mypoint
(point-at) What is the Y?: 200

You can even alias the alias command – because why the heck not :)

-> alias a alias
a mypoint 100

a is now the shortcut hand for alias

WHY U NO USE PYTHON CONSOLE

The Python console is fine and dandy but we are not going for a full programming language here, that isn’t the point. The point is easy to use commands.

You could have a function called point_at in Python that would be

point_at(123,1331)

Handling incomplete functions is a lot harder because of the Python parser. In the end it’s easier and better IMO to just make a simple DSL for this and get all the power of a DSL then try and fit into Python.

It should also be noted that the commands defined in the plugin can still be called like normal Python functions because there is no magic there. The command bar is just a DSL wrapper around them.

Notes

This is still a bit of an experiment for me so things might change or things might not work as full expected just yet.

Check out the projects readme for more info on things that need to be done, open to suggestions and pull requests.

Also see the docs page for more in depth information

Perth QGIS User Forum/Group


I have a feeling this year is going to be a interesting one for QGIS in Australia. What’s a better way then to start the year of with two great events on the same day in Perth, Australia. A QGIS User Forum/Group, and the regular Perth GeoRabble

Here is the official invitation to the upcoming QGIS User Group/Forum in Perth, Australia.

Inaugural Australian QGIS Forum

Digital Mapping Solutions is pleased to support, what will hopefully be, the first of many inspiring QGIS user forums. The goal for this event is to provide a casual environment where people can see QGIS in action as well as discuss and share their QGIS experiences and thoughts. The event will feature a variety of real-world demonstrations by QGIS users from a cross-section of industries.  There will also be a presentation by Nathan Woodrow, an active member of the open source GIS community, developer on the QGIS project and an OSGeo advocate.  Finally, there will be plenty of time for discussion during the presentations and networking over lunch. Whether you are already a QGIS user who is looking for an opportunity to share your experiences with others or if you are a potential user who is curious as to how QGIS can enhance your GIS toolkit, this is the event for you.

Event Details
Date and Times
Thursday  March 14th 2013

10.00am - Registration
10.20am - Welcome and  introduction
10.30am - Presentations commence
12.00pm - Open discussion
12.30pm - Lunch
1.30pm - Finish
Location
Kailis Bros Fish Market & Cafe
Function Room
101 Oxford Street 
LEEDERVILLE WA  6007
RSVP
To register please email joanne.smith@mapsolutions.com.au
on or before Friday March 8th 2013

Please let us know if you have any access issues or specific dietary requirements when you register.
Places are limited so please register your interest today.

and the invitation to the GeoRabble event:

Announcing GeoRabble Perth #5  - Return to Yesteryear -
Thursday, March 14, 2013
Venue: Upstairs at the Leederville Hotel
Time: Door @ 5:30pm for a 6:00pm start of presentations
Speakers:
Mike Bradford
Tom Gardner
More Speakers and the event sponsor to be announced very soon

As you can see from the QGIS Perth User Group invitation I will be attending and presenting – practice makes prefect – so I’m really looking forward to the event. Still not sure what I’m going to cover yet though.

Leaving! Getting a New QGIS Job!


This week is my last week at Southern Downs Regional Council. On Monday I’m starting a new job. A QGIS related job. WIN!

I have worked at Southern Downs Regional Council for the last seven years and have been grateful for every year. The people, the work, the experience, has all be excellent. It has been a great seven years and I never imagined that I would be leaving, maybe at the ten year mark, but here it is. Starting at SDRC right out of high school without any skills or knowledge of what GIS is or was I grew to love it very quick. Learning GIS, evidently, lead me to programming. Nothing to crazy at first, some VBA here, some MAPBASIC there, MapInfo added the ability to call .NET dlls so I got into VB.NET, which lead me to C#, QGIS entered about three years ago which started me down the road of C++ and Python. Throw in some GPS surveying, data collection, database stuff, bushfire mapping, planning scheme mapping, floods, and you have yourself a nice skill set that you never expected to learn – hell some early school teacher even told my parents I would never do anything useful because “I only did computers”.

So enough with the rambling personal history lesson and more about the new stuff. My new job is a Technical Consultant/QGIS Specialist with Digital Mapping Solutions(DMS), a great – of course they are great why else would I work for them – Australian GIS company. DMS were/are the sponsors of the QGIS MS SQL provider and run QGIS training courses around Australia. My new role will be focused around QGIS and QGIS clients in Australia, although it’s not limited to that. I’m really looking forward to promoting, using, and helping other people use QGIS in Australia. I really do think there is a good market for it here, and if the growing interest over the last year is anything to go by I feel it is going to be a really interesting year. Working from home, meeting new people, learning awesome skills, pimping QGIS, what’s not to love!

My blog will continue as normal, if not more. Expect to see more QGIS in Australia, hopefully we can get some regular meetups happening.

I do have to give credit to the QGIS team and community. Without the great team and community around QGIS I very much doubt any of this would have happened

My QGIS git workflow


I thought it might be handy to post the git workflow that I use when working on QGIS, or any project for that matter.

In the following examples upstream = https://github.com/qgis/Quantum-GIS.git. If you have cloned from your github fork of QGIS you can add upstream using:

$ git remote add upstream https://github.com/qgis/Quantum-GIS.git

The first thing we need to do is pull down the latest changes from the main QGIS repo aka upstream

$ git fetch upstream
remote: Counting objects: 13, done.
remote: Compressing objects: 100% (1/1), done.
remote: Total 7 (delta 6), reused 7 (delta 6)
Unpacking objects: 100% (7/7), done.
From github.com:qgis/Quantum-GIS
   18cd145..89bdb10  master     -> upstream/master

Now that we have the changes in our local repo we need to bring our master branch up to date with the latest changes from upstream. I use rebase here because I don’t want to see merge master into master etc etc each time I want to bring my master branch up to date. In the end I want my local master branch to reflect upstream/master exactly

$ git rebase upstream/master
First, rewinding head to replay your work on top of it...
Fast-forwarded master to upstream/master.

Note: You can combine the two into one call using: git pull upstream master --rebase

In order to do any work in git you should really be using branches. We can check a new one out using:

$ git checkout -b working
Switched to a new branch 'working'

This will checkout a new working branch off my local master branch and switch to it.

Lets do some work.

$ git commit -a -m "Add some feature"
[working 8cd2f4b] Add some feature

$ git commit -a -m "More feature stuff"
[working 72d30ad] More feature stuff

$ git commit -a -m "bug fix"
[working 25b10e5] bug fix

$ git commit -a -m "bug fix"
[working 211e387] bug fix

Note: The -a means add any changed files to the commit. You can also use git add. I’m trusting you already understand how to add files to a commit.

Now at this point I could merge my changes into the master branch and push it up, or if you don’t have commit rights you can issue a pull request. However having heaps of “fix this”, “fix that” commits is pretty ugly. This is where git rebase can come in handy.

We can check which commits we have added that are not in master by doing:

$ git log --oneline master..
211e387 bug fix
25b10e5 bug fix
72d30ad More feature stuff
8cd2f4b Add some feature

Alt Text

There we can see we have four commits that differ and that 8cd2f4b is the first commit we made. I really want to merge all the commits into one to make this a little cleaner.

$ git rebase -i 8cd2f4b^

Note: ^ means go back one commit from the one listed. git rebase doesn’t include the commit that you list so you have to go back one before it.

pick 8cd2f4b Add some feature
f 72d30ad More feature stuff
f 25b10e5 bug fix
f 211e387 bug fix

# Rebase 89bdb10..7d02daf onto 89bdb10
#
# Commands:
#  p, pick = use commit
#  r, reword = use commit, but edit the commit message
#  e, edit = use commit, but stop for amending
#  s, squash = use commit, but meld into previous commit
#  f, fixup = like "squash", but discard this commit's log message
#  x, exec = run command (the rest of the line) using shell
#
# If you remove a line here THAT COMMIT WILL BE LOST.
# However, if you remove everything, the rebase will be aborted.

I have changed all but the first commit to f this will merge all the commits into the first one. The latest commit is at the bottom so you should read the rebase screen from bottom up.

[detached HEAD d5620a5] Add some feature
 1 file changed, 3 insertions(+)
 create mode 100644 test.txt
Successfully rebased and updated refs/heads/working.

Alt Text

At this point I normally merge it into master and push it upstream, but if you don’t have commit rights then you can push it up to your github repo and open a pull request.

# Push them up for review
$ git push myrepo working

Important Note:

git rebase -i will change the commit hash for anything that is included in the range of commits. Make sure you only rebase commits that are not public yet. Only rebase commits that in your local repo.