Creating an instance of a Mapinfo COM object in .NET – Part Two


In part two of the series Creating a instance of a Mapinfo COM object in .NET, I’m going to be talking about creating an instance of Mapinfo’s COM object using reflection and Activator.CreateInstace.  This approach unlike the approach outlined in part one, will allow for your application to be Mapinfo version independent.

Step 1: Creating a COM instance of Mapinfo.

Unlike part one where the first step was to create a reference to the Mapinfo COM object, we won’t be needing to do that here as we are using reflection to create an instance straight away.

The first function that we need to call is called Type.GetTypeFromProgID, this will return a type  using the program ID of an application.  Where do we get this program ID from?  A listing in HKEY_CLASSES_ROOT is created when a application registers itself as a COM server, this listing includes things like the GUID of the application, the applications program ID and the path to the application to use as the COM server.  Lets have a quick look at how mapinfo is registered in the registry.

registry

If you have read part one of this series you will notice that the GUID above is for Mapinfo 9.5, we don’t need to use this GUID anywhere in this post so I have only marked it in the above picture just as a note.

You will notice two other things in the picture above, one is the key ProgID and the other is the key VersionIndependentProgID , these keys contain the program ID that can be used by Type.GetTypeFromProgID to create an instance of Mapinfo.
Enough about the registry lets see some code.

First lets get the type associated to Mapinfo using the program ID that’s in the registry, like so:

Type mapinfotype = Type.GetTypeFromProgID("Mapinfo.Application");

The above code will now search the regisrty for a application with the program ID equaling “Mapinfo.Application” and return the type for that application or as the documentation in the .NET framework says.

Gets the type associated with the specified program identifier (ProgID),
returning null if an error is encountered while loading the System.Type.

Moving on. Now that we have the type that is associated to Mapinfo’s COM object we can now go and create an instance of Mapinfo from this type, for this we will need a static method in the Activator class.  The code that we will need to call is like this:

object instance = Activator.CreateInstance(mapinfotype);

Passing the type that we got returned from Type.GetTypeFromProgID into the CreateInstance method will create an instance of Mapinfo for us and return it as a object. If we join the above code together we should have something like this:

Type mapinfotype = Type.GetTypeFromProgID("Mapinfo.Application");
object instance = Activator.CreateInstance(mapinfotype);

Now that we have created an instance of Mapinfo we can go ahead and start using it.

Step 2: Using the object.

The biggest problem with doing things this way is that because we only have the instance of Mapinfo as a object type we have to use reflection to get access to the Do and Eval methods that Mapinfo provides.

So what we will do first is create a our own Do method that wraps up the reflection process, so we don’t have to see it every time we need to call Do

public void Do(string command) {}

Now lets go on and fill out the reflection bit.

public void Do(string command)
{
      parameter[0] = command; 
      mapinfoType.InvokeMember("Do",
                    BindingFlags.InvokeMethod,
                    null, instance, parameter); 
} 

The above code will invoke the Do method in Mapinfo using reflection and pass in the command string that we supplied.

A note about the above code because we are using a COM object we have very limited use of reflection and have to use the InvokeMember method, which is slow compared to the optimized reflection methods that we can use on .NET objects. I won’t go into details here but if you do a quick google search on InvokeMemeber vs Methodinfo.Invoke speed you will find what I’m talking about. Moving on. See speed test section form notes.

Now that we have to Do method out of the way lets move on to eval. Pretty much the same process but it will return a string insteed of a void type.

public string Eval(string command)
{
      parameter[0] = command; 
      return (string)mapinfoType.InvokeMember("Eval", BindingFlags.InvokeMethod,
                             null,instance,parameter); 
} 

Done, now lets put that all together in a nice class with a static CreateInstance method.

public class Mapinfo
{
   private object mapinfoinstance;
   public Mapinfo(object mapinfo)
   {
     this. mapinfoinstance = mapinfo;
   }

   public static Mapinfo CreateInstance()
   {
        Type mapinfotype = Type.GetTypeFromProgID("Mapinfo.Application");
        object instance = Activator.CreateInstance(mapinfotype);
        return new Mapinfo(instance);
    }

    public void Do(string command)
    {
          parameter[0] = command;
          mapinfoType.InvokeMember("Do",
                    BindingFlags.InvokeMethod,
                    null, instance, parameter);
     }

     public string Eval(string command)
     {
         parameter[0] = command;
         return (string)mapinfoType.InvokeMember("Eval", BindingFlags.InvokeMethod,
                             null,instance,parameter);
      }
}

Now that we have it wrapped up in a nice class we can go ahead and use it in our application, something like this:

public static void Main()
{
    Mapinfo mymapinfo = Mapinfo.CreateInstance();
    mymapinfo.Do(//Run some command);
}

Summing up: Pros and Cons

In summng up, lets have a look at some of the pros and cons of this approch. Pros

  • Allows Mapinfo version independence.

Cons

  • Not strongly typed
  • Is late bound using reflection = no complier support + slower speed See Speed test section
  • Using reflection has speed issues due to it having to get type information everytime Do or Eval methods are called. See Speed test section
  • You have to write wrapper methods around the reflection process.
  • Can’t easily get to methods that Mapinfo provides, with out wrapping them up first.

This approach has a lot more cons then pros as you can see, some of them are pretty big ones, the real only advantage it gives you is the ability to work with any version Mapinfo. My next post will outline a method that allows both version independence and strong typed access and no late binding.
Creating an instance of a Mapinfo COM object in .NET – Part One


This the first blog post in the series Creating a instance of a Mapinfo COM object in .NET.

In this post I am going to talk about creating an instance of using Interop.Mapinfo.dll. So lets get into it.

Step 1: Adding a referance to Mapinfo.

First we need to add a reference to Mapinfo’s COM object, this can be done in a few different ways, for now I will just focus on the main method.

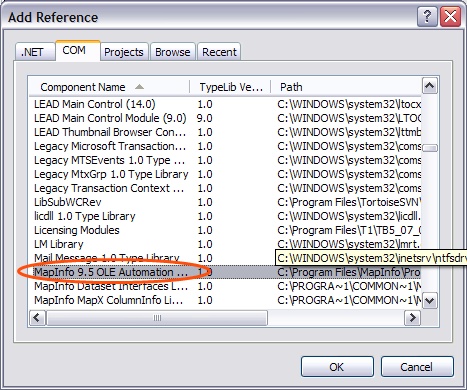
You will need to open the add reference dialog in Visual Studio and select the COM tab, this should give you a list of all the COM objects that have been registered on your machine.  You will need to select the one marked “Mapinfo x.x OLE Automation” where x.x is the version of the currently installed Mapinfo.  For example:

COM Dialog


Once you have found and selected the Mapinfo COM object, you can then click OK.  When you return to Visual Studio you will notice that a referance to Mapinfo has been added to your project. 

referance added


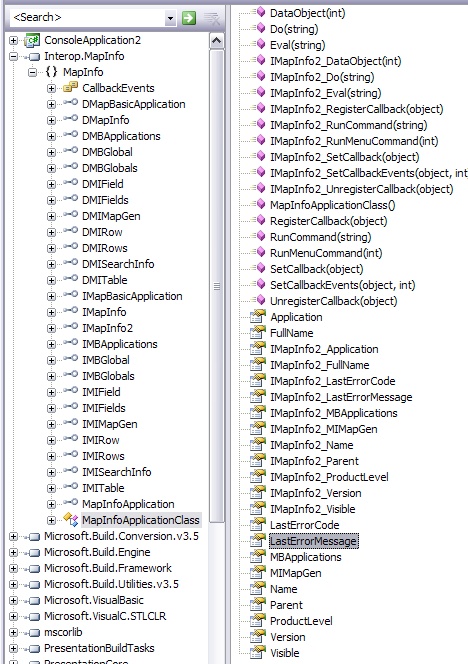
By checking the object browser, you will notice that by adding a reference to Mapinfo’s COM object, we now have strong typed access to its members.

objects1


(Note: Picture may differ slightly to other versions of Mapinfo).

We now have strongly typed access to Mapinfo’s COM methods. When we add a reference to a COM object using Visual Studio it will create a dll in the form of a RCW(Runtime Callable Wrapper). This then wraps all the exposed COM members into .NET objects which are responsible for marshaling all the calls between your .NET application and the COM object, including any type conversion that needs to be preformed. 

Now that we have got all of that out of the way lets move on to step 2.

Step 2: Creating the instance

When you are using the Interop.Mapinfo.dll, creating an instance of the currently installed Mapinfo is very easy.
In the picture above you can see a class called MapInfoApplicationClass, this is the object we will be using to create an instance of Mapinfo.  Having said that, all we need to do is create a new MapinfoApplicationClass like this:

MapInfo.MapInfoApplicationClass mapinfo = new MapInfo.MapInfoApplicationClass();

When this line is executed in your program  a new instance of  Mapinfo will be created and you will then be able to send commands to it by using the Do and Eval command. Like so:

MapInfo.MapInfoApplicationClass mapinfo = new MapInfo.MapInfoApplicationClass();
mapinfo.Do("Do somthing here");
string value = mapinfo.Eval("Eval something here");

Nice and easy!

So you compile your application and it runs and does what it has to do. Then a few months down the track you upgrade your version of Mapinfo and BOOM!, your application suddenly doesn’t work any more.  Why does it not work anymore?

Step 3: Finding the reason for not working with different versions.

If you go to the defintion of MapInfoApplicationClass in Visual Studio you will notice something like this:

def

Whats with that GUID?  Turns out that is the ID for the registered Mapinfo COM object, and each version of Mapinfo has a different GUID.

  • v9.5 GUID = {D66B3D9C-D465-46B8-BFB4-F63F04FB203C}
  • v8.5 GUID = {BA2638EB-CB99-4908-9915-771E04BBB7D3}

So why does your application blow up when you upgrade the version of Mapinfo or run it on different machine with a different version of Mapinfo?  Well lets have a look at the Mapinfo RCW.  

When you create a Mapinfo RCW (Interop.Mapinfo.dll) using Visual Studio it will create a MapInfoApplicationClass with the GUID attribute which matches the COM objects and when you call the constructor of MapInfoApplicationClass it will look at all the registered COM objects on the computer to see if there is one with that GUID and if it finds one it will create an instance of it. 

Summing up: Pros and Cons

In summng up, lets have a look at some of the pros and cons of this approch, most of which I’m sure you have already picked up on.

Pros

  • Allows strong typed access to members
  • Allows early binding to take place which will let the compiler check for errors.
  • Fast runtime access to methods due to early binding.

Cons

  • Tied to the version of Mapinfo that was used when creating the RCW.

There maybe only one con but I believe that it is a pretty big one.  

On the plus side, if you are just creating a once off quick and dirty app, that will only be run once, then the above method will most likely be fine.

Creating an instance of a Mapinfo COM object in .NET – Main Page


For the past week or so I have been investigating different ways of creating a COM OLE instances of Mapinfo in C#.NET.

This post series will done in three parts over the next few days, all out lining step by step the different methods for creating an instance of a Mapinfo COM object in .NET.

NOTE:  All my examples apply to C#, I will add some VB examples a bit later.

Sending commands to a Mapbasic(.MBX) program from .NET


A couple of days ago on the Mapinfo-L Google group there was a question asked regrading passing arguments to specified Mapbasic program from a .Net application using OLE.
I’m going to tackle this in two posts, the first post will just be getting the basics down, the second post I plan on doing some more useful stuff.

The first thing you can do is launch an MBX from inside a .Net application by running the following command.

    MapinfoOLEInstance.Do(@"Run Application " + "\"" + @"{myapp.MBX}" + "\"");

Now while this will launch the specified MBX in the current Mapinfo instance, Mapbasic programs do not allow arguments to be passed in at startup via another
program.  

So what is the next best solution, well Mapbasic has a reserved RemoteMsgHandler method which when declared in a Mapbasic program will leave the Mapbasic program in memory to listen for commands sent from an OLE object or until the End Program command is called.  

Lets go ahead and create a basic Mapbasic file which will just load in Mapinfo and listen for commands, like so:

Note:  I will add comments to the source code to explain each section, and will be refered to as RemoteTest.mb/.mbx


Include "MAPBASIC.DEF" 
Include "MENU.DEF" 

Declare Sub RemoteMsgHandler 
Declare Sub Main 

Sub Main
    ' We don't need to doing anything here.
End Sub  

Sub RemoteMsgHandler 
    Dim command as String 

    'Call commandinfo to get the string that was sent to us. 
    command = CommandInfo(CMD_INFO_MSG) 
    Note command 
End Sub 

Notice how Sub Main above doesn’t contain any code, now normally if you where to run this program in Mapinfo
it would run and then just exit because it reached the end of Sub Main 
but in the RemoteTest.mb program above we have declared the reserved method called RemoteMsgHandler which will cause the program to stay in memory and not exit once it has finished in Sub Main. 

Now once the RemoteMsgHandler mehtod is called we can call CommandInfo(CMD_INFO_MSG) to get the command that was sent from our .Net application and display it in a message box.

The .Net side of things it is pretty simple basically you have to:

  1. Create an instance of Mapinfo.
  2. Run the RemoteTest.MBX. (remember that sub main dosn’t do anything so it will just sit there)
  3. Get all the running Mapbasic programs inside our instance of Mapinfo.
  4. Find our program using its name.
  5. Pass a command to our RemoteTest.MBX application.

Enough talk lets see some code:

First we will start with step 1 and 2 from the list above.

Step 1: Create an instance of Mapinfo.
Step 2: Run the RemoteTest.MBX.

        //... normal using statements
        using Mapinfo;
        static void Main(string[] args) 
        { 
            //Create a instance of Mapinfo
            MapInfoApplicationClass mapinfoinstance = new MapInfoApplicationClass();
            //Make this instance visible, this is just so we can see the note statement. 
            mapinfoinstance.Visible = true; 
            //Create a command string that contains the path to our mbx to be run.
            string appcommand = "Run Application " + "\"" + @"RemoteTest.MBX" + "\""; 

            //Run the command in Mapinfo.
            mapinfoinstance.Do(appcommand);
        }

Now save and run the above code, if everything went ok the code should run, load Mapinfo and run the MBX file and just sit there.
If it did, great! That’s what we wanted it to do.

Now stop your .Net program and close the running instance of Mapinfo.
On to the next step:

Step 3: Get all the running Mapbasic programs inside our instance of Mapinfo.

We can get all the running Mapbasic programs inside Mapinfo by using the following command:

     DMBApplications MBApps = (DMBApplications)mapinfoinstance.MBApplications; 

MBApplications contains a collection of the currenly running Mapbasic programs running inside your instance of
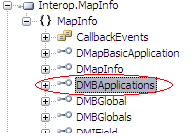
Mapinfo.  Because MBApplications is just an object type we have to cast it to the DMBApplications interface which can be found in the Mapinfo namespace.

DMBApplications

 Now onto the last two steps.

Step 4: Find our program using its name.

Step four can be done two ways, one way is if you have LINQ and the other is just using a for loop.  I will show the LINQ method first.

             //If you can use LINQ you can do this:
             DMapBasicApplication  myapp = (from DMapBasicApplication app in MBApps
                                            where app.Name == "RemoteTest.MBX"
                                            select app).Single();
 

and now the for loop

            //If you don't have LINQ you can do this.
            DMapBasicApplication  myapp;
            foreach (DMapBasicApplication app in MBApps) 
            { 
                if (app.Name == "RemoteTest.MBX") 
                { 
                    myapp  = app; 
                    break; 
                } 
            }  
 

MBApps(which was declared in step three) should have had a collection of Mapbasic programs that are running in Mapinfo.  We can cast each one of these programs the inteface DMapBasicApplication found in the Mapinfo namespace. 

Both the above methods should preform around the same,   I prefer the LINQ method as it feels a little bit cleaner.

Step 5: Pass a command to our RemoteTest.MBX application.

The last thing we have to do is pass the command into the Mapbasic program,  which can be done like this.

myapp.Do("Hello World");

When myapp.Do is called, it will call the RemoteMsgHandler in our Mapbasic file and pass in the “Hello World” string, which we then read and print to a messsage box.

That is pretty much it.  You should be able to complie and run.  Mapinfo should show you a message box with “Hello World” printed in it.

The final .Net code should look like this, using LINQ of course :).

        //... normal using statements
        using Mapinfo;
        static void Main(string[] args) 
        { 
            //Create a instance of Mapinfo
            MapInfoApplicationClass mapinfoinstance = new MapInfoApplicationClass();
            //Make this instace visible, this is just so we can see the note statement. 
            mapinfoinstance.Visible = true; 
            //Create a command string that contains the path to our mbx to be run.
            string appcommand = "Run Application " + "\"" + @"RemoteTest.MBX" + "\""; 

            //Run the command in Mapinfo.
            mapinfoinstance.Do(appcommand);
            DMBApplications MBApps = (DMBApplications)mapinfoinstance.MBApplications; 
            DMapBasicApplication  myapp = (from DMapBasicApplication app in MBApps
                                            where app.Name == "Test.MBX"
                                            select app).Single();
            myapp.Do("Hello World");
        }

In my next post I will create a simple method name parser in the RemoteMsgHandler method to handle calling methods inside of a our Mapbasic program.

Showing a WPF form in Mapinfo 9.5.


Being able to call methods inside of an dll or exe that has a CLR header is one of MapInfo 9.5 newest features. MapInfo 9.5 was released a couple of weeks ago now and since then I have been playing around with this new ability which I must say has some really good advantages with .net being a type safe and managed.

Then first thing I tried was to call a shared method in a dll that presented very basic win32 form with a couple of buttons on it, this works like a charm and was very easy to do (I’ll make my next post about this). Anyway yesterday I was sitting there looking at the create a new project dialog in Visual Studio and thought “I wonder if I can show a WPF form in MapInfo”.

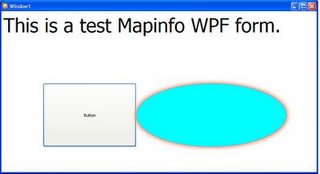
It turns out that you can show a WPF form in MapInfo 9.5 but I requires some different code then that of the Win32 way. I created a basic WPF form with some text “This is a test MapInfo WPF form” and a button. Now for the code in order to show a WPF form in Mapinfo you need to use a class called Windows.Interop.WindowInteropHelper which will allow you to use a window handle as the owner of the of a WPF form becuase the WPF form ShowDialog function dosn’t take any arguments like the Win32  

The resulting code looks like this:

using System.Windows.Interop;
//...
public static void ShowForm(int handle)
        {
            Window1 window = new Window1();
            WindowInteropHelper helper = new WindowInteropHelper(window);
            helper.Owner = new IntPtr(handle);
            window.ShowDialog();
        }

Now when you run the mbx calling the ShowFrom method it will set the owner of the WPF form to the MapInfo window with that handle. Which will result in something like this:

wpfform